|
|
||
|---|---|---|
| .. | ||
| Bootloader_Upgrade | ||
| Connector | ||
| Flashsize_F103 | ||
| Makefile.inc | ||
| README.md | ||
| Readme | ||
| platform.c | ||
| platform.h | ||
| stlink_common.c | ||
| usbdfu.c | ||
README.md
Blackmagic for ST-Link Adapters
With recent ST firmware, the ST-Link v2, ST-Link v2-1 and v3 can be used with Black Magic Debug App rather than having to flash this firmware to the adaptor.
Running the BMP firmware on ST-Link v2 and ST-Link v2-1 provides:
- built-in gdb server on the dongle
- VCP on ST-Link v2. Access to VCP lines needs additional wires to the STM32F103C8!
- VCP on ST-Link v2 clones (Baite), accessible on the bare PCB.
- no mass storage device (MSD). A MSD may collide with company policies.
For all commands below, unplug all other BMP/ST-Link beside the target(*1)
If your adaptor offers SWIM pins on the connector (many of clones of the official adaptors do this)
then they often don't provide a UART interface. In this case, build the firmware with
SWIM_AS_UART=1 to repurpose the pins as the UART interface provided to the host over USB.
Note: on some clones, SWIM is strongly pulled up by a 680 Ohm resistor.
Upload BMP Firmware
- Keep the original ST Bootloader.
- Compile firmware with
make PROBE_HOST=stlink ST_BOOTLOADER=1 - Upload firmware with stlink-tool from stlink-tool(*3).
- For ST-Link v2, as on older disco boards, un- and replug USB to enter the bootloader.
- Upload BMP firmware with
stlink-tool blackmagic.bin - For ST-Link v2, after each stlink replug, call either
blackmacic -torstlink-toolwithout arguments or on Linux use some udev rule like the one shown below to enter the BMP firmware
> cat >/etc/udev/rules.d/98-stlink.rules <<EOF
SUBSYSTEM=="usb", ATTRS{idVendor}=="0483", ATTRS{idProduct}=="3748", ACTION=="add", RUN+="<path-to>/stlink-tool"
EOF
Reverting to original ST Firmware with running BMP firmware
- Get ST-Link upgrade firmware and unzip. Change to "stsw-link007/AllPlatforms/" in the unzipped directory.
- To enter Bootloader again use
dfu-util -e, or with ST-Link v2 un- and replug. - For ST-Link v2(Standalone) run
java -jar STLinkUpgrade.jar -jtag_swim -force_prog - For ST-Link v2(embedded) run
java -jar STLinkUpgrade.jar -jtag -force_prog - For ST-Link v2-1 run
java -jar STLinkUpgrade.jar -msvcp -force_prog - For ST-Link v3 run
java -jar STLinkUpgrade.jar -d8_d32_msc_br -force_prog(*2)
(*1) Command arguments are available to specify some specific of several devices. Look at the help for blackmagic, stlink-tool and dfu-util if really needed. For STLinkUpgrade.jar, no documentation is known, but strings ./st/stlinkupgrade/app/a.class may give a clue.
(*2) Loading firmware V37 and higher to ST-Link v3 with original bootloader will inhibit further debugging the F723 on the ST-Link itself. There are patched bootloaders out there that do not set RDP2.
(*3) Pull request to original author pending.
Versions
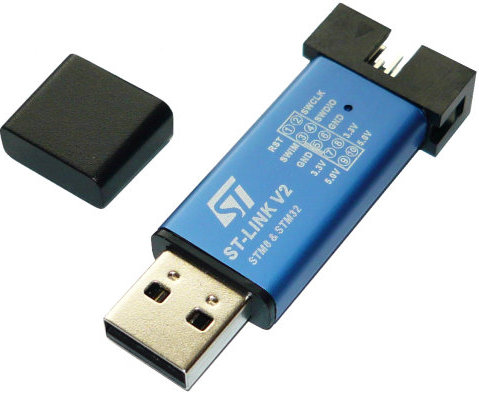
Standalone ST-Link v2
Accessible connectors for JTAG/SWD (20-pin) and SWIM. ST-Link v2/ISOL).
ST-Link v2 clones aka "baite"
JTAG/SWD/SWIM are on a 10-pin connector. CPU SWD pins are accessible on the board.
SWIM-only ST-Link adapters on STM8 Discovery boards
JTAG and target SWIM pins are accessible on connector (footprints). They are handled in the swlink platform.
SWIM-only ST-Link adapters on STM8 Nucleo-Stm8 boards
As only a SWIM connector is accessible, they are not usefull as BMP target.
SWD only ST-Link adapter (Stm32 Nucleo Boards, recent Discovery boards)
SWD, SWO and Reset are accessible on a 6-pin connector row. Jumper allow to route SWD to on-board target or off-board. Newer variants have UART TX/RX accessible on a connector According to on-board target variant, some signals have open (resistor) jumper between debugger and target. Newer variants have transistor for USB reenumeration Newer variants may switch onboard target power. Newer Variants may have level shifters for some signals to onboard target.
ST-Link v1
CDC ACM USART pins are not accessible. MCO output is used for LED. Use the swlink platform!
ST-Link v2 and ST-Link v2-A
CDC ACM USART pins are not accessible. MCO is connected to on board target.
ST-Link v2-1 and ST-Link v2-B
ST-Link v3SET
Wiring on Discovery and Nucleo Boards
If there is a 6-pin connector, connect an external target after removing the 2 jumper shortening the 4-pin connector like this:
- VCC sense, used only for measurement
- SWCLK
- GND
- SWDIO
- nRST (pulled high by on board target. Will reset with on board target unpowered.
- SWO
BMP version detection and handling
All ST-Link variants:
- PC13/14 open -> Standalone ST-Link v2 or baite, some STM32 Disco w/o accessible UART RX/TX
- PC13 low -> SWIM internal connection
- PC13/PC14 both low -> ST-Link v2 on some F4_Diso boards.
ST-Link v2.1 force Bootloader entry
On ST-Link v2/2-1 boards with the original bootloader, you can force bootloader entry with asserting NRST of the STM32F103CB of the USB powered board. Serveral attempts may be needed.